Pages

Friday, April 29, 2022

Teddy Bear's Picnic


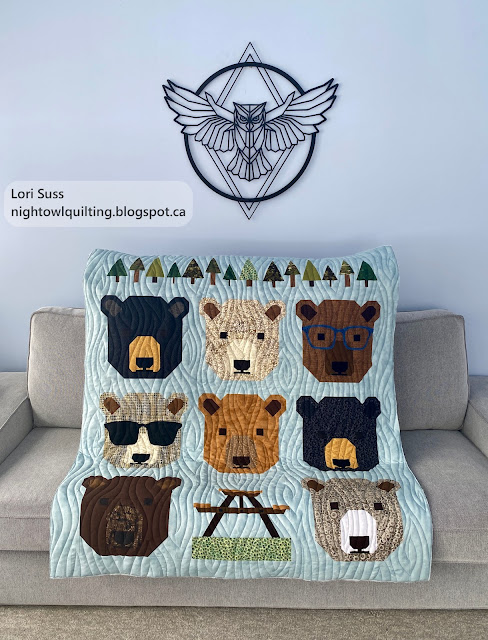
Karen made this darling quilt she is calling "Teddy Bear's Picnic."  The bear blocks are from the pattern Bjorn Bear by Elizabeth Hartman and Karen added her own trees,  and the cute paper pieced picnic table from Pitcher's Boutique.


The plaid backing is perfect for the theme.  This quilt is for Karen's first grandchild and she said the blue glasses represent her husband and that she is always wearing sunglasses. Karen decided on my freehand woodgrain quilting design.  It is one of my favorite things to quilt and I love being able to avoid stitching through eyeballs in the process!


Wednesday, April 27, 2022

Diamond Strings

Amy decided that it was time to tame her brown scrap bin and she came up with the sweet idea.  The pattern she used is a free Bonnie Hunter Tutorial called Diamond Strings.


The beautiful cream sections were calling out for some custom quilting, and we decided on a light custom quilting plan that involved no rulers, only freehand quilting.


I enjoyed the freedom of quilting this one with a variety of loops and curls, curves and feathers in the border.


I love the pattern that emerged on the backing.  Not quilting around all the blocks and between the borders gives nice relaxed quilting look.


Tuesday, April 26, 2022

Petal Junction - Little Forester Fusion


This is the second sample that I made of the new Highway 10 Designs pattern called Petal Junction.  I used a mix of solids and blenders from a variety of designers and prints from the Little Forester Fusion collection from Art Gallery fabrics.  The background is an Art Gallery solid in a color called Crystalline.

Petal Junction works with either FQs or Half Yard cuts and I decided to use 16 Half Yards to make this generous double quilt (seen below on my queen sized bed).

Many of the printed fabrics from the collection were directional, but the pattern instructions make it easy to keep everything headed in the right direction.

One of my favorite parts of this particular quilt is the back.  

In the pattern we suggest that you sew an extra seam at times during the construction process to create some Bonus HSTs from what would otherwise becomes scraps.  With the bonus HSTs and some extra background fabric, I was able to piece all of the star blocks that float on the quilt backing.  I love my Bloc Loc ruler for trimming the HSTs - one of the best investments in my quilting studio!

I decided to use the Bora Bora for the quilting and treated myself to some lovely wool batting for some extra loft.

Petal Junction is available as a PDF download or in paper formats on the Highway 10 Designs website or the Etsy shop.


Monday, April 25, 2022

Petal Junction- New from Highway 10 Designs


Kathy and I are very excited to announce the newest pattern offering from Highway 10 Designs called Petal Junction. 


Petal Junction was designed with large blocks to showcase the beautiful fabrics prints we all love on the bolt and hate to cut into small pieces.  The pattern instructions easily keep directional prints upright. The pattern includes seven sizes from Toddler to King and as always is available as a PDF download or in paper format.


Instructions are included for using both Fat Quarter or Half Yard bundles for the focus fabrics.  The background can be a single fabric, a variety of coordinating Fat Quarters or totally scrappy.  The instructions also include a fabric and time saving bonus idea.


I have a number of samples to show and first up is the cover quilt that was made by one of our wonderful testers - the fabulous Reneta.  Reneta selected a wonderful line of fabric called Harmony from Riley Blake Designs.   There are a number of one way directional prints in the collection and Petal Junction accommodated them with ease.


Reneta made the throw size quilt using 20 Fat Quarters and selected the Calder pantograph for the quilting.

Next up is a quilt from another tester - our awesome Amy.  Amy made the lap size quilt and selected the Figo Fabrics Desert Wilderness collection.  She chose a different layout than Reneta did for hers. 


Kathy dug into her Art Gallery fabric stash and chose some of her favorite pieces from the Kismet and Homebody collections for her two samples.  I think quilters often feel they should keep a collection together when it arrives tied with a pretty ribbon, but mixing and matching can make things even better!  They look so different with a dark versus a light background!


For the light version Kathy opted to use a selection of low volume Fat Quarters to add interest to the background.

I love seeing a big piece of those gorgeous floral prints in the block centres!


Add last but not least for today is a sample I made in the Primavera collection from Figo Fabrics.  


During the construction process we suggest that you sew an extra seam at times to create some Bonus HST from what would otherwise becomes scraps.  With the HSTs that I made and some squares cut from the bits of remaining fabric I was able to create a few small projects. (The larger the quilt the more HSTs you will have for another day.)


My youngest daughter moved into her first apartment and she received a hand me down freezer from her brother in law that had seen some life, so I made this cute little topper to pretty it up, along with some coordinating hot pads.


I will be sharing more about another Petal Junction quilt that I made in my next post, but here is a sneak peek for now...


Sunday, April 24, 2022

Conway Album


The absolutely amazing work of art was made by Leslie. The quilt is called the Conway Album (I'm not from Baltimore) and is from a book published in the 1990s.  Leslie began this quilt in class taught by Marlene Reimer and she said it has likely been in the works for over 20 years. 


When I unfolded this quilt top I was taken aback by all of the unique details in the hand embroidery and the intricate borders.  I was impressed by the workmanship that went into making this and truly a bit overwhelmed that this beauty was left in my hands for custom quilting. I'm not sure my pictures will do this quilt justice but maybe a large quantity of photos will help you appreciate it.


My first task was to look at all of the different elements in the layout out of this quilt and come up with a quilting plan that would enhance the top without overdoing it, and try to keep the quilting even so that the quilt with lay nicely.


I decided to quilt around the applique in the blocks and centre and then do an echo pattern to fill the blocks.  The tiny saw tooth border that framed the blocks was stitched in the ditch.


The large green setting triangles received a feather motif.


And the swag border received a complementary feather motif.


The white border to the inside of the swags received bead board, and the outer white section received branching curls.


Here are some closeup that show the 3d parts of the floral embroidery.


And now a parade of pictures to show you more of the front and back of the magnificent quilt.