Tuesday, September 24, 2019

Allie Owl


I quilted this cute owl wall hanging as my first project back to make sure my longarm was working properly after the move.  My friend Reneta pieced the top for me.  The pattern is by Elizabeth Hartman and is called Allie Owl.


The quilting on the owl was pretty easy for me to figure out, but how to handle the back ground had me stumped and ripping a bit.  I am really happy with the final design choice now!


I was asked by my daughter to make a travel pouch for her new wireless head phones.  I came across this "Multipurpose zipper pouch" by Peggy Sews that was just the right thing with its tapered shape and flat bottom.  It comes in 5 sizes with a free easy to print pdf.  You can find it on the Peggy Sews page  here.  I used Soft and Stable instead of batting and added a few quilting lines, but otherwise I followed the instructions and will definitely make it again.


Monday, September 23, 2019

Back in Business


We have been in our new home for about a month and a half and my sewing area is unpacked and organized.... for now.  The basement in our house was finished but the main area was one very large room.  Our basement is about 1900 sq. ft, and I would say that about 3/4 of it was just one large room.  The previous owners left a MASSIVE 100+ year old, 6' x 12' snooker table for us, and I am currently trying to sell that as it takes up too much space - see below.


This is the view standing on the basement stairs.  I used a some of my old sewing furniture, some new to me old furniture and some random furniture pieces to define a space.  We will build a proper wall and built in storage and add proper lighting eventually.  My wonderful husband put up three temporary shop lights so that I could function as it was very dim down there.


The longarm is up and working and ready for client quilts again.


We removed this bar which then made room for my sewing machine and more.


And here is my wall of storage pieces that divides my space from the TV area.  The brown dresser has all my thread and pantographs for longarm quilting.   The shelf with the blue bins has my serger, cover lock, client quilts and my fabric stash and projects.

As I was unpacking I took the time to reorganize my fabric stash by color for the most part.  These are fabrics that aren't set aside for a current project (those are boxed and bagged with the associated pattern).   


I used my standard 6" x 24" ruler to fold everything to the same dimensions. (You could use any size ruler that will produce a finished size to fit your storage areas.)  It took a bit of time but it really made it easier to organize and use space efficiently.  I wrapped everything from from fat 1/8s to yardage to wide backs this way.
  1. Lay your fabric down on a flat surface.  I put my selvage edge(s) on the right and fold (for full width fabric) or cut edge for a FQ on the left.  Lay your ruler down and wrap edge of fabric around it.
  2. Roll your fabric around your ruler until you come to the end.  
  3. Leave the end of the fabric as is,  or fold it under a bit if it ended at an awkward spot close to the edge.
  4. Remove your ruler.
  5. Fold in half once.
  6. Fold in half a second time.


Monday, September 9, 2019

Atomic Starburt


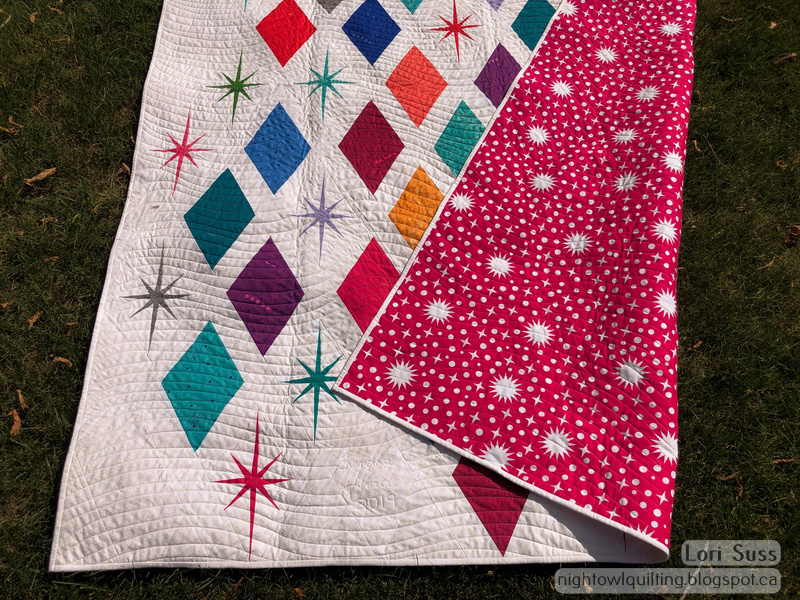
September is upon us and I am finally starting to feel organized after our move from Dauphin, MB to Selkirk, MB at the beginning of August.  There are still boxes to unpack and pictures to hang, but it is feeling better everyday.  In between unpacking and trying to find time to enjoy some summer activities, we moved daughter #2 in to residence at the University of Manitoba for her first year, so our new home is also feeling the effects of an empty nest.  I am happy to finally share Kendra's grad/dorm room quilt!

 
The pattern is called Atomic Starburst by Violet Craft.  I added more blocks to the original pattern so that it would be more of a single bed size. Kendra and I looked at many examples of this pattern with heavy custom quilting, but somehow that just didn't feel right for us.  Freehand wavy lines let the pattern and fabrics shine. The stars and diamonds are Alison Glass Sunrprints by Andover, background is Simply Neutral by Northcott, and the wide backing is Rhoda Ruth by Robert Kaufman.


I always love to add some personalization in the quilting when I can.  I interrupted the wavy lines to add these details.


I made two throw pillow covers from some of the leftovers. I loosely followed this Diamond Lattice Pillow tutorial from sewswetness.com I think they turned out pretty cute and were really easy.


Here is a close up of the quilting on those.  I wanted the diamonds to pop so I added tight u-turns in the sashing.


And here you can see the ensemble in action!


Monday, July 29, 2019

Falling in Love Again


Now that the wedding was celebrated this weekend I can share this fabulous quilt that Amy made for her brother and sister-in-law.  The pattern is called "The Fabriculous Falling in Love Again" and is available at Fabriculous in Swan River or Gimli Manitoba or through the online store.


I have personalized wedding quilts for Amy in different ways in the past, and we continued the trend with this one.  The white heart gave me the perfect canvas to add the couple's last name - Lone.  (When it was on my machine, my family members were confused as to why I was quilting the word lone on this quilt!)


The body of the quilt was quilted with the "Flirtatious" pantograph in a gold Maginifco thread.  I love the effect - to me it looks like streamers on the Ombre Confetti Metallic fabric by V & Co for Moda.


I will show you the method I used to do the quilting in the heart.  I used my computer to print out the letters for the name.  I gave Amy a few fonts to choose from and she selected this one.  I always set the font to a black outline with a white fill so I don't use up a crazy amount of ink unnecessarily. I trimmed the letters, leaving little bridges between them to help keep the spacing accurate.


I traced around my stencil with a water soluble fabric pen.  It was too humid to use an air soluble on that day. I then used the gold thread to stitch around the letters.  I went around the letters more than once so that they would stand out a little bit more.


Then all that was left to do was pebble the backgroudn to make the letters pop!


I was so excited with the final product!  I hope the couple love it as much as Amy and I did.


Sunday, July 28, 2019

A Few Last Finishes


I have been busy finishing up a few small client quilts in my studio over the last few weeks as our moving date was fast approaching. We are leaving the Dauphin for new adventures in Selkirk,  Manitoba!  My studio will be closed for the month of August while we get settled, but I'm happy to take bookings now for the fall. nlsuss @ mymts.net (Remove spaces)


The first two quilts I/m sharing were made by Reneta.  I love this red scrappy one.  I used a new to me pantograph called "Gingersnap."  I love the look of it on this quilt.  I used a red SO Fine thread on top and a grey Bottom Line in the bobbin.


I recently shared Reneta's larger version of this Simply Dashing quilt.  Being the scrap queen that she is, she used her leftovers and with careful planning and the smallest amount of additional fabric she made the baby/lap size.


Reneta asked for the Maple Syrup pantograph and I was happy to oblige.


Wendy sent me this cheery purple and white quilt she made for her granddaughter.  Unfortunately the weather didn't cooperate for any outdoor photos.  A pretty quilt needed a pretty pantograph so we decided on "Pieces of my Heart." 


And last but not least this darling log cabin baby quilt made by Tracy. She left the quilting choices up to me and decided some feathers and swirls would be just the right touch.


Sometimes I think it is fun to see the before and after shots.  


And one last shot of the back.


Friday, July 26, 2019

Irish Chain


Working on this quilt brought me so much joy! Cheri brought this quilt into the studio, asking for advice.  It belongs to a widower friend from her home town.  His wife did not complete this quilt before she passed away, and he wanted to see if it could be finished. When Cheri received the quilt, it was basted together with a thin batting, and a wide binding attached to the front. Neither of us had ever encountered a binding being attached before quilting. After Cheri and I looked at it for a while, we realized that the binding was a little too small for the top, causing it to not lie flat.  Cheri agreed to remove the binding and basting and ready a new back.  We added some modern batting, I just got to play and do the quilting!


Cheri and I discussed some design ideas, but she mostly left it up to me.  The hardest part was to figure out what to quilt in the braid border! 


I chose straight lines for the blue chain squares, and continues curves in the peach squares.  Molar feather and curl wreaths in the open spaces, a wavy line in the inner border, and a curl and feather in all the braid sections.


The maker was an interior designer by trade and I love how she used the various shades of blue in the chains.  I definitely adds interest to the finished product.


Cheri and I chose a solid beige for the backing fabric and I love how the quilting shows up.  I believe the owner intends to hang it on the wall so it really won't be seen, but I enjoyed looking at it!


I never know exactly what is going to come through the door of my studio, by I am thankful Cheri brought this one to me to help finish so that it didn't languish in a drawer any longer.