Friday, October 31, 2014

Peekaboo Baby Quilt #2


This is Reneta's go to baby quilt pattern and it is the second one I have had the pleasure of quilting.  Behind each set of orange flaps is a different fussy cut farm animal.


Reneta provided a lush Cuddle backing so I used Dream puff batting for a super cuddly quilt.


Thursday, October 30, 2014

Ina's Disappearing Nine Patch #1


This is the fourth quilt in Ina's series for her local care home.  This time it is a Disappearing Nine Patch to help her "work through" her fabric.


Since there was a lot of pink on the front, and the backing Ina provided had a pink floral on cream, I decided to use a feminine panto.  This is the first time I have stitched "Lorien's Sweet Pea" and I really like the result.  I decided to use quilt a dark pink So Fine! thread for the quilting.  It doesn't really blend in anywhere, but a light pink to match the background was too stark on the darker feature squares.


Wednesday, October 29, 2014

Band Fundraising Quilt


Recently my local guild received a request for a fundraising quilt for the local high school band program.  The guild members were happy to support the cause.  My quilting buddy Reneta and I offered to head up the project as we both have children in the band program.


We asked members to make scrappy positive and negative versions of this block.  The ladies were very generous and this quilt came together quite easily.


I quilted it with a white Magnifico thread on the front and a charcoal Bottom line for the back.  We bought a lovely charcoal grey Stonehenge backing that shows off the Fascination pantograph nicely.  The black and white prints pretty much hide everything on the front!


I hope the band program raises lots of money on this quilt. Tickets will be available soon!


Tuesday, October 21, 2014

10 Minute Block


This pretty quilt belongs to Dawn. It is the Ten Minute Block and you can watch a tutorial here if you are interested in making one of your own.  Dawn used 5" squares.


Dawn told me that the recipient of this quilt was a really girly girl and left the rest up to me.  I tend not to think of filling a quilt with feathers, but this one was asking me to.  I decided to repeat the to open diamond shape where the four squares meet and add feathers around that.


One of the joys of being a longarmer is watching the quilt begin to transform before your eyes.  I always like to step back and make sure I am happy with my design choices before getting too far along.  I had a good feeling at this point!


 I used Quilter's Dream Puff batting and a medium blue So Fine! thread.  I did add one line of stitching in the 3d diamonds so they didn't stand up too much.


Saturday, October 18, 2014

Alpine Wonder - Binding and Bling


I am happy to say I have totally completed my Alpine Wonder quilt. Binding and 12 dozen crystal added the final touches.  The original pattern had many more crystals, including amber colored ones on the tree, but I decided to leave the tree natural so that I could enjoy this hanging during the winter, not only the holiday season.


 The pattern had very little detail about how to attach the multi-colored gradient binding.  I love the effect that the end product has, but getting there took a little head scratching.


I pieced four binding strips together as shown above. I knew that I wanted the light parts of the fabric to be in the centers of the sides and that the green and blue should change where the snow met the sky.   


I decided to use a non typical method of attaching the binding where you join the strips at the four corners. Believe it or not, this "stitched mitered corner binding" was this first binding method I was taught, and although it is not my go to method of choice it does come in handy every now and again. 


Sew the strips to each side of the quilt, stopping a 1/4" from the corner, and leaving about a 3' tail on each side. (With this method I could match the binding seam between the blue and green to the snow/sky line.)


I now own this cool tool to help with the next part of the process, but it can be done with a regular ruler, or another binding miter tool.


In order to mark your sewing line on the binding, you need to fold your quilt in half on the diagonal (right side together) and pin the edges of the binding strips together.  I was able to use my Corner Mark-it tool to quickly mark my line after lining up the guides on the ruler.


If you do not have a special tool you can mark your sewing line as shown above by doing the following:

1.    Mark a line perpendicular to to the edge of the binding at the end of the stitching line. Shown in red.
2.    Mark a 45 degree line from the end of the stitching to the fold of the binding. Shown in yellow.
3.  Mark a 45 degree line from the point of intersection of the perpendicular line and the folded edge of the binding to the raw edge of the binding. Shown in green.


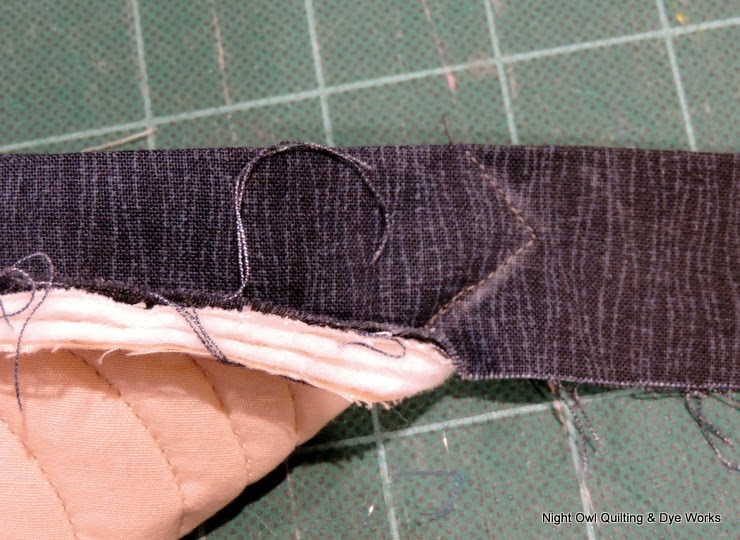
This is what your stitching line will look like.  Be sure to shorten your stitch length and use a matching thread.


Trim close to your sewing.  I usually do a test to make sure that everything is lying nicely before doing my final trim.


Turn your binding to the back of the quilt.  You can see here that the miter has formed on both the front and the back.  All that remains is to stitch the edge of the binding to the back of the quilt.  No corners to manipulate.


I love seeing how this one changed from a simple unfinished top to something I am really excited to keep at my house!


Friday, October 17, 2014

Alpine Wonder - Phase 1

I decided that I needed to sneak a quilt of my own in the quilting line up and really didn't want another winter to pass with out finishing this one.  The pattern is called Alpine Wonder and I bought it as a kit a few years back.  When I completed the top I had only had my longarm for a few months and didn't think that my skills matched my vision for what I wanted,  so I put it away.  I got busy with customer quilts last fall and didn't make time for this one - that had to change.


My machine was empty but I didn't really have anything suitable for backing, but I did have lots of white.  I decided to soften the bright white with a little tea staining.  

I began by heating water in my stock pot and adding some tea bags.  (This whole process was a little but of guess work.)


I brought the water to the boil and let the tea steep for a few minutes until it was quite stong, and then removed the tea bags.


I removed the pot from the heat and added my bright white fabric. Be sure to stir well.  I let it sit for about an hour. I would recommend stirring it quite often to avoid any dark or light spots as the fabric peaks out of the top of the water.


I drained the fabric in my kitchen sink and wrung out as much tea as possible.


Then I let it sit in a cool water rinse for about 20 minutes to help set the tea stains and rinse out any residual tea. You may want to do this more than once.  


After the rinse I popped it into the dryer and here is the end result - a much more subtle backing fabric.  Since this is only for the back of a wall hanging, and it likely won't see the laundry, this seemed like a quick and no mess method for tweaking my backing fabric.


Here is a look at how the quilting turned out - almost finished!