Sunday, December 23, 2018

Sashed Half Hexagon Quilt


The last client quilt I finished before Christmas was for Cindy.  The pattern is by Missouri Star and is called "Sashed Half Hexagons."    


Cindy provided this Minkee dot backing and left the pantograph choice up to me.  The pattern in the border fabric made me think of confetti, so the "Flirtatious" pantograph that makes me think of streamers seemed very fitting.


I found this fabric collection to be a very pleasing but unique color palette.  It is from Art Gallery Fabrics and is from the Sparkler Fusion collection.   I used a greyed purple thread that didn't stand out too much on the black, but was a bit interesting.


Tuesday, December 18, 2018

Detour - Primary color love


This is the second set of "Detour" place mats with matching table runner that Reneta made for a lucky family members as Christmas gifts.   These are really bright and cheerful in primary colors. 


A mix a straight line quilting and curls in a navy thread was all they needed to feel complete.


This pattern by Highway 10 Designs really does look great in any color combination.  Pattern is available as a PDF download or as a traditional paper pattern in our Etsy Store.  Wholesale inquiries welcome to highway10designs@mymts.net


Thursday, December 13, 2018

Quarter Sections x 2


I made this Quarter Sections quilt to have on hand for the arrival of a baby girl.   Quarter Sections by Highway 10 Designs uses fat quarters this baby size only takes 5!   Add a border and you are almost done!


 I decided to quilt some freehand flowers in the body of the quilt and and fun feathers in the border.


The backing is is a pretty pink flannel.


This is Reneta's latest version of our Quarter Sections pattern.  The  Dr. Seuss fabric is cheerful and Reneta even trimmed some small panel pieces to fit in place of few blocks.


Reneta provided a red minky backing and I thought the "Quirky" pantograph was the perfect compliment.


Quarter Sections is a very versatile pattern and uses almost the entire fat quarter.  If you have some fat quarters or need a quick gift, consider it.  You can find it in the Highway 10 Designs Etsy Store.


Tuesday, December 11, 2018

Leaf Me Alone to Quilt


This stunning quilt was made by the very talented Cindy.  The pattern is called "Leaf Me Alone to Quilt" by Joan's Own Creations.  Cindy put a lot of work into this top between the applique, satin stitching and piecing in the border alone!   Enjoy some photos of this beauty....


I chose a few different background fills to compliment the leaves in the blocks.  I decided to leave the block frames and the leaf shapes in the border unquilted, and help them pop by filling the brown background with pebbles.  100 weight thread was the order of the day!


This oak leaf trio was my favorite.


I used crosshatching, stippling, curls and swirly wind for the backgrounds. 


We used one of my Stonehenge wide fabrics on the back, and I have to say I enjoyed seeing the quilting on the back.


Thanks for trusting me with your quilt Cindy, I had a lot of fun working on it!


Sunday, December 9, 2018

Simply Dashing by Highway 10 Designs


I am excited to introduce the newest quilt pattern from Highway 10 Designs - 
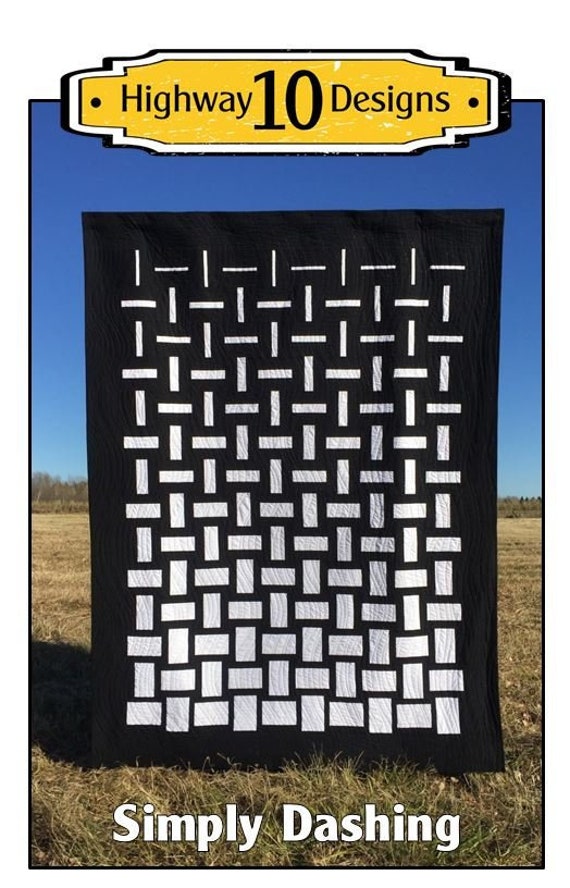
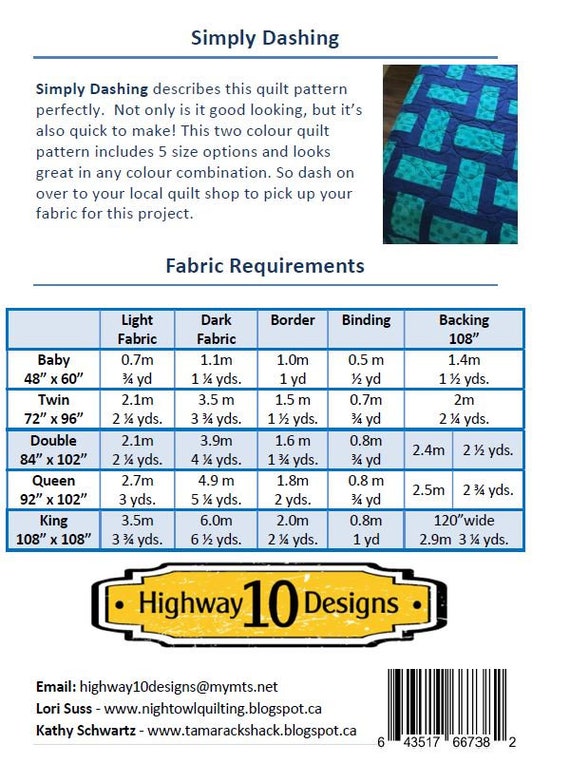
Simply Dashing.  Two fabrics in a unique layout make for a simple to make, but eye catching quilt.  The pattern comes with instructions for 5 sizes from a generously sized baby to king sizes.  We love this pattern so much that we have already made it in three totally different colorways that I will share.  It is available as a PDF download or in paper format in the Highway 10 Designs Etsy Store.


Kathy pieced our cover quilt in classic black and white.  It is so crisp and really brings out the geometric nature of the quilt.  Kathy took awhile to decide how she wanted to quilt it as she she loved the pieced top just as it was, and didn't want to detract from the graphic design.  In the end gently flowing vertical lines using an invisible thread was just the right finish.


The first quilt that I pieced to test drive the pattern was this pink and grey version in the baby size.


I quilted this version with a pantograph called Sweet Pea that compliments the motif in the pink fabric.  It was quilted using a grey So Fine thread that blended nicely into the background fabric so the quilting just added some texture but didn't distract from the design of the quilt.


And now my favorite version of Simply Dashing- our teal and navy one that I pieced and quilted.


And here you can see how great the design looks on a bed.


The Moda Grunge Dot fabric inspired me to quilt more circles all over the quilt.  I love how it turned out! 


I wasn't 100% sure my idea would translate to the quilt the way it looked in my head, but after taking a step back and looking at my first pass I was feeling much more confident.


I am a hand guided quilter, no computer to quilt perfect circles here, so I used circle templates to create the design.  I settled on 4 different sizes,  a 2", 3", 4" and 5".  My hands were tiring quite quickly trying to hold on to the slippery templates,  so I cut small pieces of shelf liner and slipped them under the templates and it really made a huge difference.  I didn't attach the shelf liner to the template, simply placing it underneath was sufficient.


I randomly grabbed the different size circles and stitched around them. I would double stitch around part of the template to travel to where the starting point for the next template needed to be.  The first little bit took quite a bit of thinking to achieve the look I was after, but after not too long I found my groove and the quilting progressed at a reasonable pace.


 I hope you enjoyed seeing Simply Dashing in its 3 versions.  I left out one part of the story - how this quilt got its name.  Head on over to visit Kathy's post at www.tamarackshack.blogspot.com to read all about it!


Sunday, December 2, 2018

Advent Mini Stocking Calendar Tutorial


When my oldest daughter went away to University three years ago, I handled it fairly well.  Even though I missed her at our house, I was excited for the chapter of her life she was embarking on.  When it came time to put out our family advent calendar with little pockets that I filled with treats for my two daughters, I was really bothered that she wouldn't be around to share in the fun.  I decided I needed to do something else for the following year so that both my girls could enjoy our advent tradition even though in different cities.  I decided to make two sets of mini stockings that would be used as their new advent calendars. I was so pleased with the end result that I decided to write up a tutorial and include the necessary templates that you can download here.


Last year the girls both received a box containing 25 stockings filled with treats and a note saying that if it was returned to mom, it would be filled again every year.  Along with twine and mini clothespins for hanging, there was another note saying that they could choose a more elaborate hanging set up of their choice and approach the parent with the appropriate skill set, depending on what they wanted.  Last year Kyla was in a small semi private dorm room so she kept her stocking in the box and retrieved her treat each day.  This year she is in her own apartment so she hung her set up with the twine and mini clothespins that were originally included.


Kendra is still at home and requested what both girls thought my be really neat - a tree shape fashioned out of birch logs.... that was Nolan's territory so I was off the hook!


If you are curious Nolan cut the birch into 12", 15", 18", 21" and 24" lengths and left approximately 7" in between the levels.


When coming up with a plan, I knew I wanted to create something that would be long lasting.   I designed the stockings to finish at about 7" in height.  For now they have room for extra treats like a hot chocolate pouch, mascara or lip gloss.  In the future they will have enough room for treats for their significant others and maybe even some future grand kids!


Above is just a peak at how they went together, I detail everything in the tutorial which you can always find on my Tutorials and Freebies page that you can see at the top of the blog.

.  The fabric I used was a Moda collection from a few years ago that I didn't have a plan for, but couldn't leave in the store called "JOL."  Making two sets at once was a bit of an undertaking, but well worth it  The back of my Innova longarm proves to be an invaluable workshop again and again!